'%3e%3cpath%20d='M153.995%200C131.044%200%20113.368%206.01549%20100.689%2015.9179C88.0104%2025.8203%2080.6993%2039.1469%2075.5168%2051.4555C70.3343%2063.7642%2067.0027%2075.5638%2063.671%2084.0317C60.3394%2092.4997%2057.5631%2095.785%2055.1569%2096.618C21.6556%20108.51%200%20140.531%200%20177.688V189.534H11.8458C27.8098%20189.534%2035.5836%20192.866%2039.2391%20195.827C42.8947%20198.789%2044.3291%20202.167%2045.162%20208.043C45.9949%20213.92%2045.5785%20221.092%2046.6427%20229.144C47.198%20233.17%2048.0309%20237.704%2050.7147%20242.1C53.3985%20246.496%2058.2572%20250.29%2063.671%20252.095C76.2109%20256.26%2084.2623%20258.897%2089.2135%20261.72C94.1647%20264.543%2097.1261%20267.088%20101.059%20275.417C104.807%20283.329%20109.851%20291.982%20118.828%20298.368C127.805%20304.754%20139.882%20308.178%20155.106%20307.993C180%20307.669%20194.854%20294.805%20202.489%20283.561C206.329%20277.915%20209.013%20273.057%20211.373%20269.864C213.733%20266.671%20215.167%20265.422%20217.666%20264.681C233.723%20259.869%20244.088%20251.725%20249.872%20242.47C255.656%20233.216%20256.766%20224.146%20258.386%20218.038C260.006%20211.93%20261.162%20209.524%20265.049%20206.933C268.936%20204.341%20277.82%20201.38%20296.144%20201.38H307.99V189.534C307.99%20173.2%20308.545%20154.182%20301.327%20136.228C294.108%20118.274%20277.682%20102.402%20250.612%2096.2478C250.335%2096.2015%20250.011%2096.3403%20248.761%2094.767C247.512%2093.1938%20245.615%2090.0472%20243.949%2085.8826C240.617%2077.5998%20237.424%2065.4763%20232.103%2052.9363C226.782%2040.3963%20219.193%2026.8846%20206.561%2016.6583C193.928%206.43195%20176.576%200%20153.995%200ZM153.995%2023.6918C172.226%2023.6918%20183.378%2028.3653%20191.753%2035.1675C200.129%2041.9696%20205.728%2051.5018%20210.263%2062.1909C214.797%2072.8799%20217.99%2084.4482%20222.108%2094.767C224.144%2099.9033%20226.365%20104.716%20229.882%20109.204C233.399%20113.693%20238.535%20118.089%20245.059%20119.569C266.391%20124.428%20274.304%20133.174%20279.116%20145.112C282.772%20154.182%20282.864%20166.629%20283.188%20178.799C270.047%20179.909%20259.265%20182.269%20251.723%20187.313C241.728%20194.023%20237.517%20204.341%20235.435%20212.115C233.353%20219.889%20232.566%20225.581%20229.882%20229.884C227.198%20234.187%20222.802%20238.445%20210.633%20242.1C202.211%20244.645%20196.149%20250.429%20192.124%20255.797C188.098%20261.165%20185.692%20266.07%20182.869%20270.234C177.224%20278.563%20173.152%20284.07%20154.735%20284.301C143.075%20284.44%20136.828%20282.173%20132.525%20279.119C128.221%20276.065%20125.075%20271.622%20122.16%20265.422C116.884%20254.224%20109.805%20245.987%20101.059%20240.99C92.3138%20235.992%2083.1981%20233.54%2071.0746%20229.514C70.9821%20229.329%2070.288%20228.45%2069.9641%20226.182C69.3626%20221.648%2069.7327%20213.642%2068.4834%20204.712C67.234%20195.781%2063.5785%20184.953%2054.0463%20177.318C47.3831%20171.95%2037.851%20169.267%2026.653%20167.693C30.1234%20144.881%2042.108%20126.233%2062.9307%20118.829C75.5168%20114.387%2081.7173%20103.42%2085.8819%2092.9161C90.0464%2082.4122%2093.0078%2070.7051%2097.3575%2060.3399C101.707%2049.9748%20106.843%2041.2292%20115.126%2034.7973C123.409%2028.3653%20135.07%2023.6918%20153.995%2023.6918ZM118.458%2071.0753C111.933%2071.0753%20106.612%2079.0342%20106.612%2088.8441C106.612%2098.654%20111.933%20106.613%20118.458%20106.613C124.982%20106.613%20130.304%2098.654%20130.304%2088.8441C130.304%2079.0342%20124.982%2071.0753%20118.458%2071.0753ZM165.841%2071.0753C159.316%2071.0753%20153.995%2079.0342%20153.995%2088.8441C153.995%2098.654%20159.316%20106.613%20165.841%20106.613C172.365%20106.613%20177.687%2098.654%20177.687%2088.8441C177.687%2079.0342%20172.365%2071.0753%20165.841%2071.0753Z'%20fill='white'/%3e%3c/g%3e%3cdefs%3e%3cclipPath%20id='clip0_514_58'%3e%3crect%20width='308'%20height='308'%20fill='white'/%3e%3c/clipPath%3e%3c/defs%3e%3c/svg%3e)
Upscaler Nodes
Upscaler Nodes are powerful tools within the Dal Nulla editor designed to improve the quality and resolution of your assets, including both images and videos. They also support background removal for both images and videos. Whether you have a low-resolution generated image, a blurry video, or need to isolate a subject from its background, the Upscaler Node can help.
Inputs & Outputs
| Port | Direction | Type | Description |
|---|---|---|---|
| source | In | Image/Video | Source media from Reference Image, Scene, Draw, Network Image, other Upscaler, or HTML nodes |
| output | Out | Image/Video | Enhanced media → Scene, Reference Image, Upscaler (chain), Text (multimodal), Draw, Canvas, HTML, AI If/Else, Google Drive Export |
Modes
The Upscaler Node has two main modes: Enhance and Background Removal.
Enhance Mode
The default mode for upscaling and improving image/video quality. Choose from multiple AI models depending on your needs.
Topaz Models (Image)
These are professional-grade upscaling models powered by Topaz Labs:
| Model | Best For |
|---|---|
| Standard V2 | General-purpose upscaling with balanced quality |
| High Fidelity V2 | Maximum detail preservation, best for photos |
| Low Resolution V2 | Heavily compressed or very small source images |
| CGI | 3D renders, game screenshots, digital art |
| Text Refine | Images containing text that needs to stay legible |
| Recovery | Old, damaged, or scratched photos |
| Recovery V2 | Improved restoration for vintage photography |
| Redefine | Creative enhancement with AI-generated detail |
Parameters:
- Scale: 1x to 4x resolution increase
- Face Enhancement: Toggle to improve facial details, with strength and creativity sliders
- Subject Detection: Automatically detect and prioritize the main subject
AI Upscaler Models (Image)
| Model | Best For | Notes |
|---|---|---|
| Clarity Upscaler | Balanced quality with creative control | 1-4x scale, creativity and resemblance sliders |
| AuraSR | Fast, cheap upscaling | Fixed 4x scale, lowest cost |
| Creative Upscaler | Artistic enhancement | Adds AI-generated detail beyond the original |
Parameters (Clarity/Creative):
- Creativity (0-1): How much the AI can add new detail
- Resemblance (0-1): How closely the result matches the original
Topaz Video Upscale
For video sources, use the Topaz Video model to upscale video resolution and interpolate frame rates.
Parameters:
- Scale: 1x to 4x
- Target FPS: 16 to 60fps (frame interpolation)
Background Removal Mode
Isolate subjects by removing backgrounds from images or videos.
Image Background Removal
| Model | Best For | Pricing |
|---|---|---|
| BiRefNet | High-quality matting with multiple variants | Pro plan |
| Rembg | Quick, simple background removal | Free |
| Bria RMBG 2.0 | Commercial-grade removal | Pro plan |
BiRefNet Variants:
- General — Works with any subject type
- General Lite — Faster, slightly lower quality
- Portrait — Optimized for people
- 2K — High-resolution output
- Matting — Soft-edge alpha matting
- Dynamic — Moving subjects
Video Background Removal
| Model | Notes |
|---|---|
| Bria Video BG | Removes background from video clips |
Parameters:
- Background Color: Transparent, black, white, or green (for chroma key)
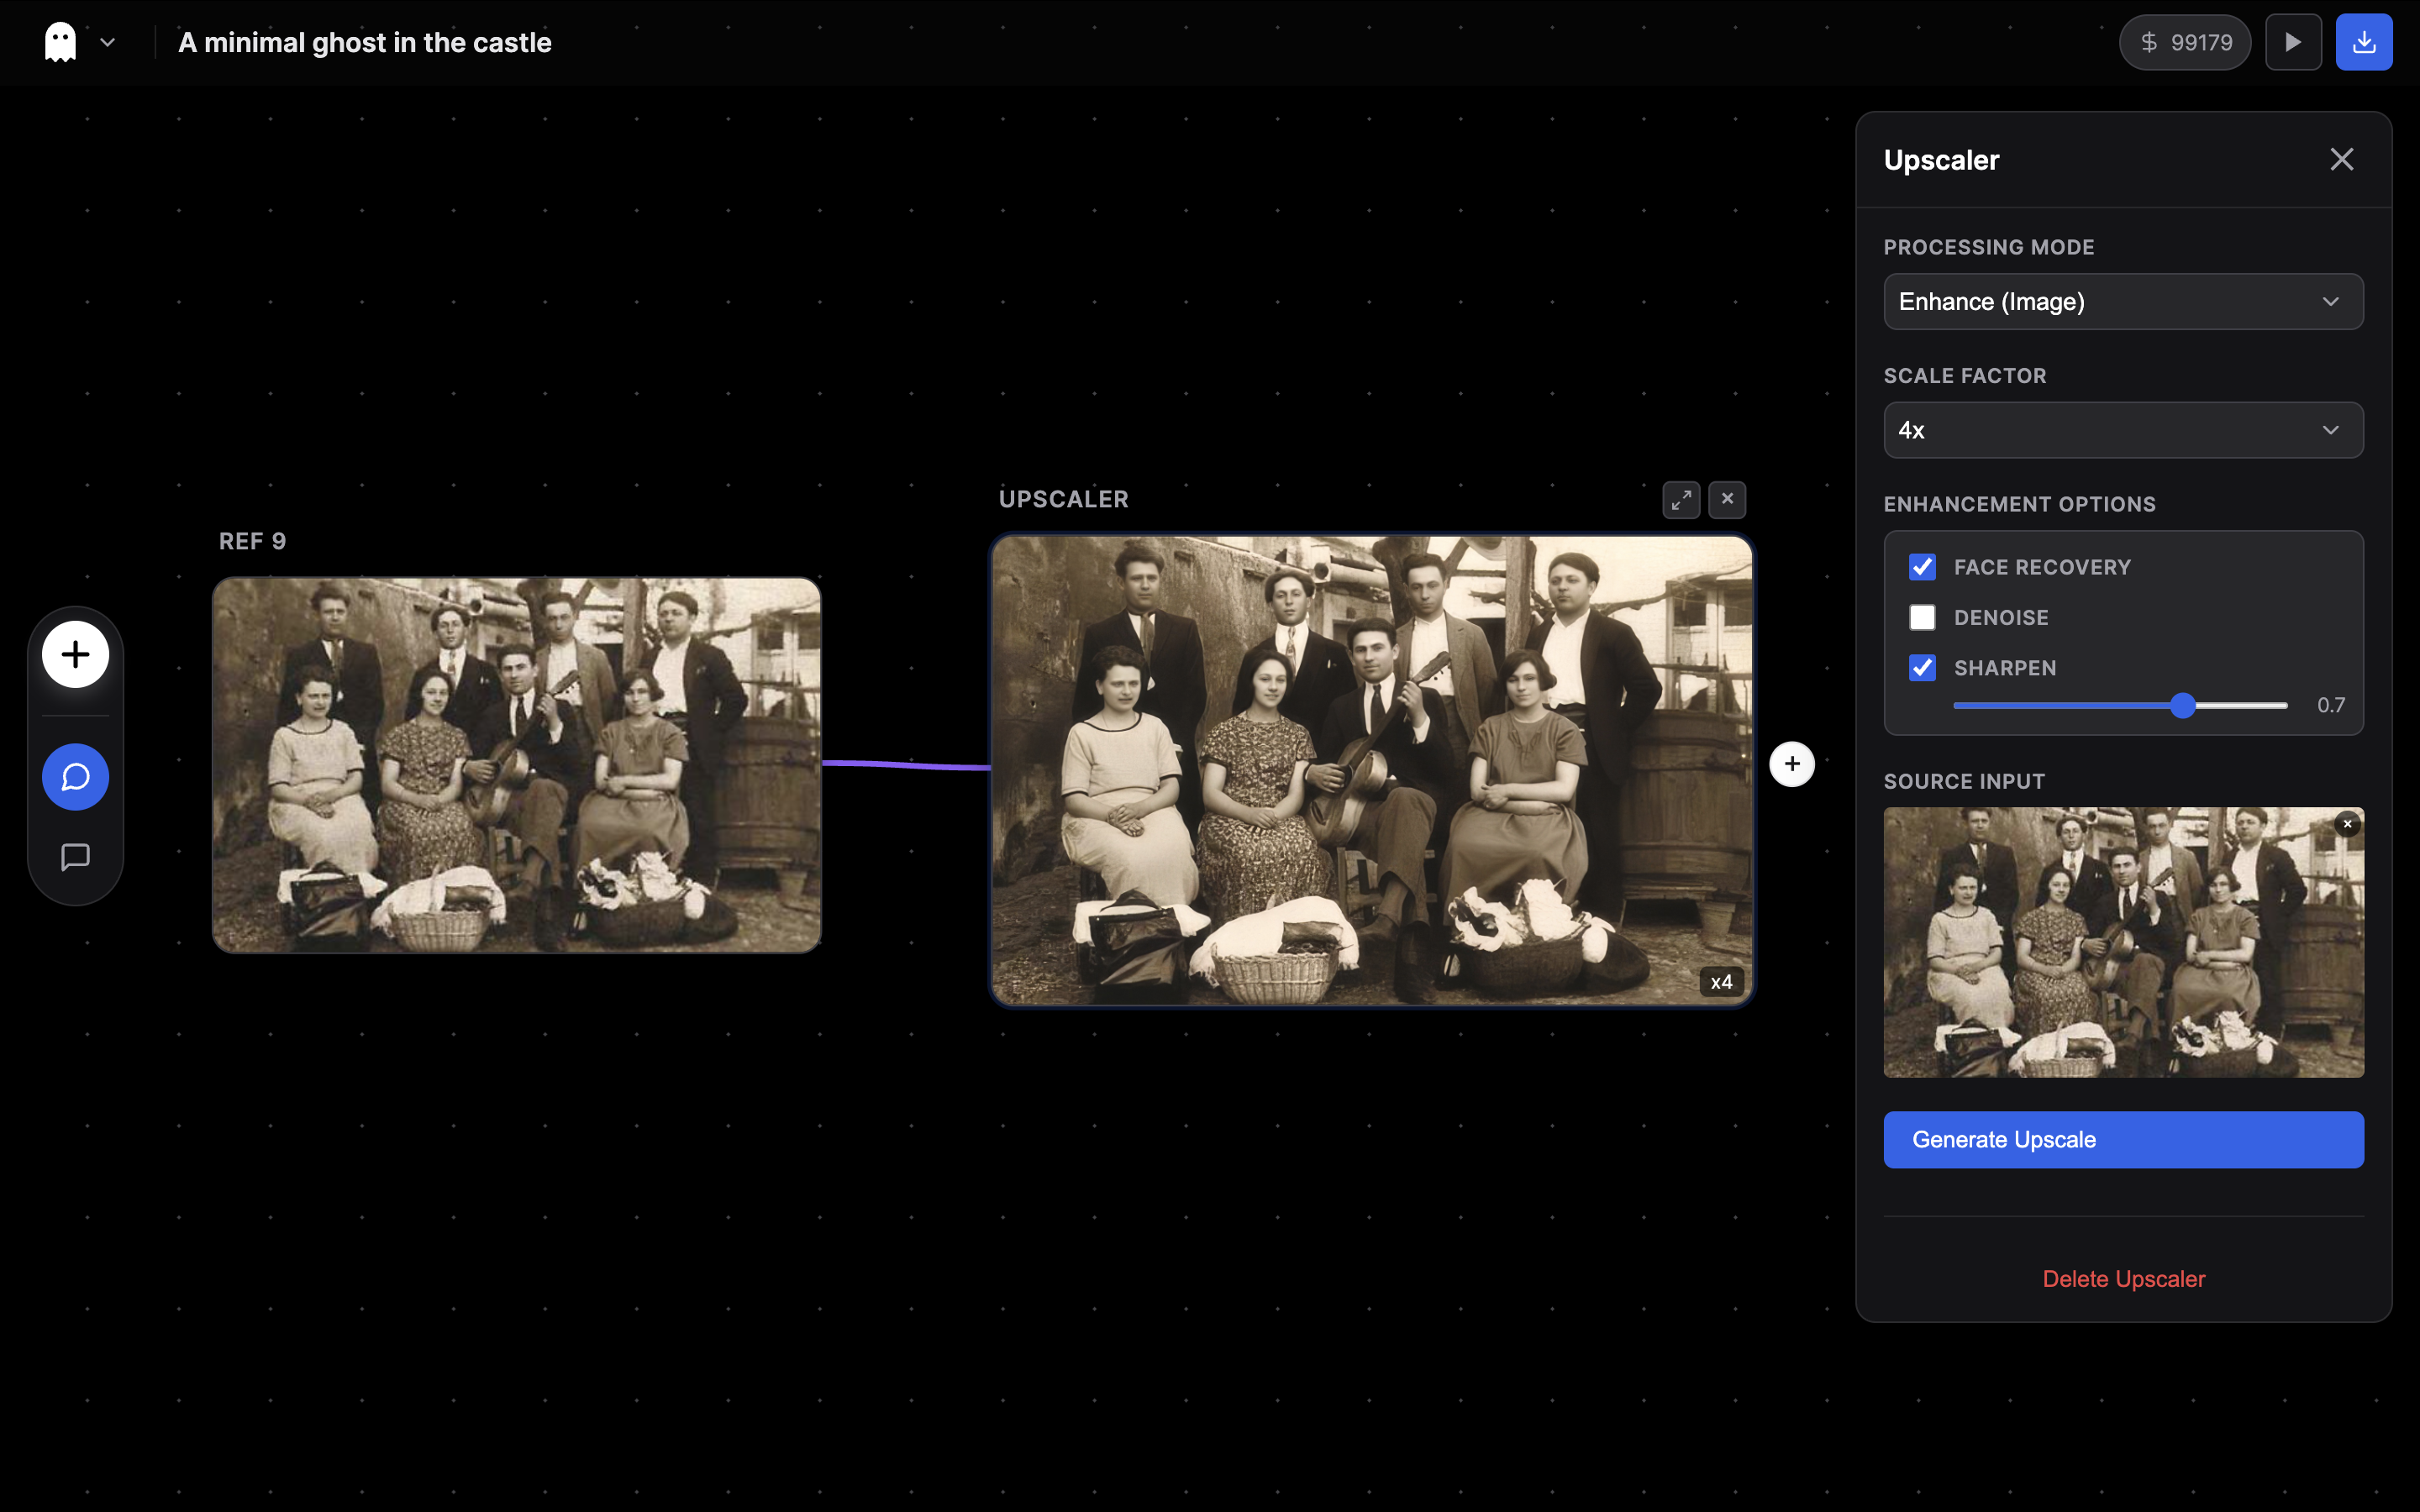
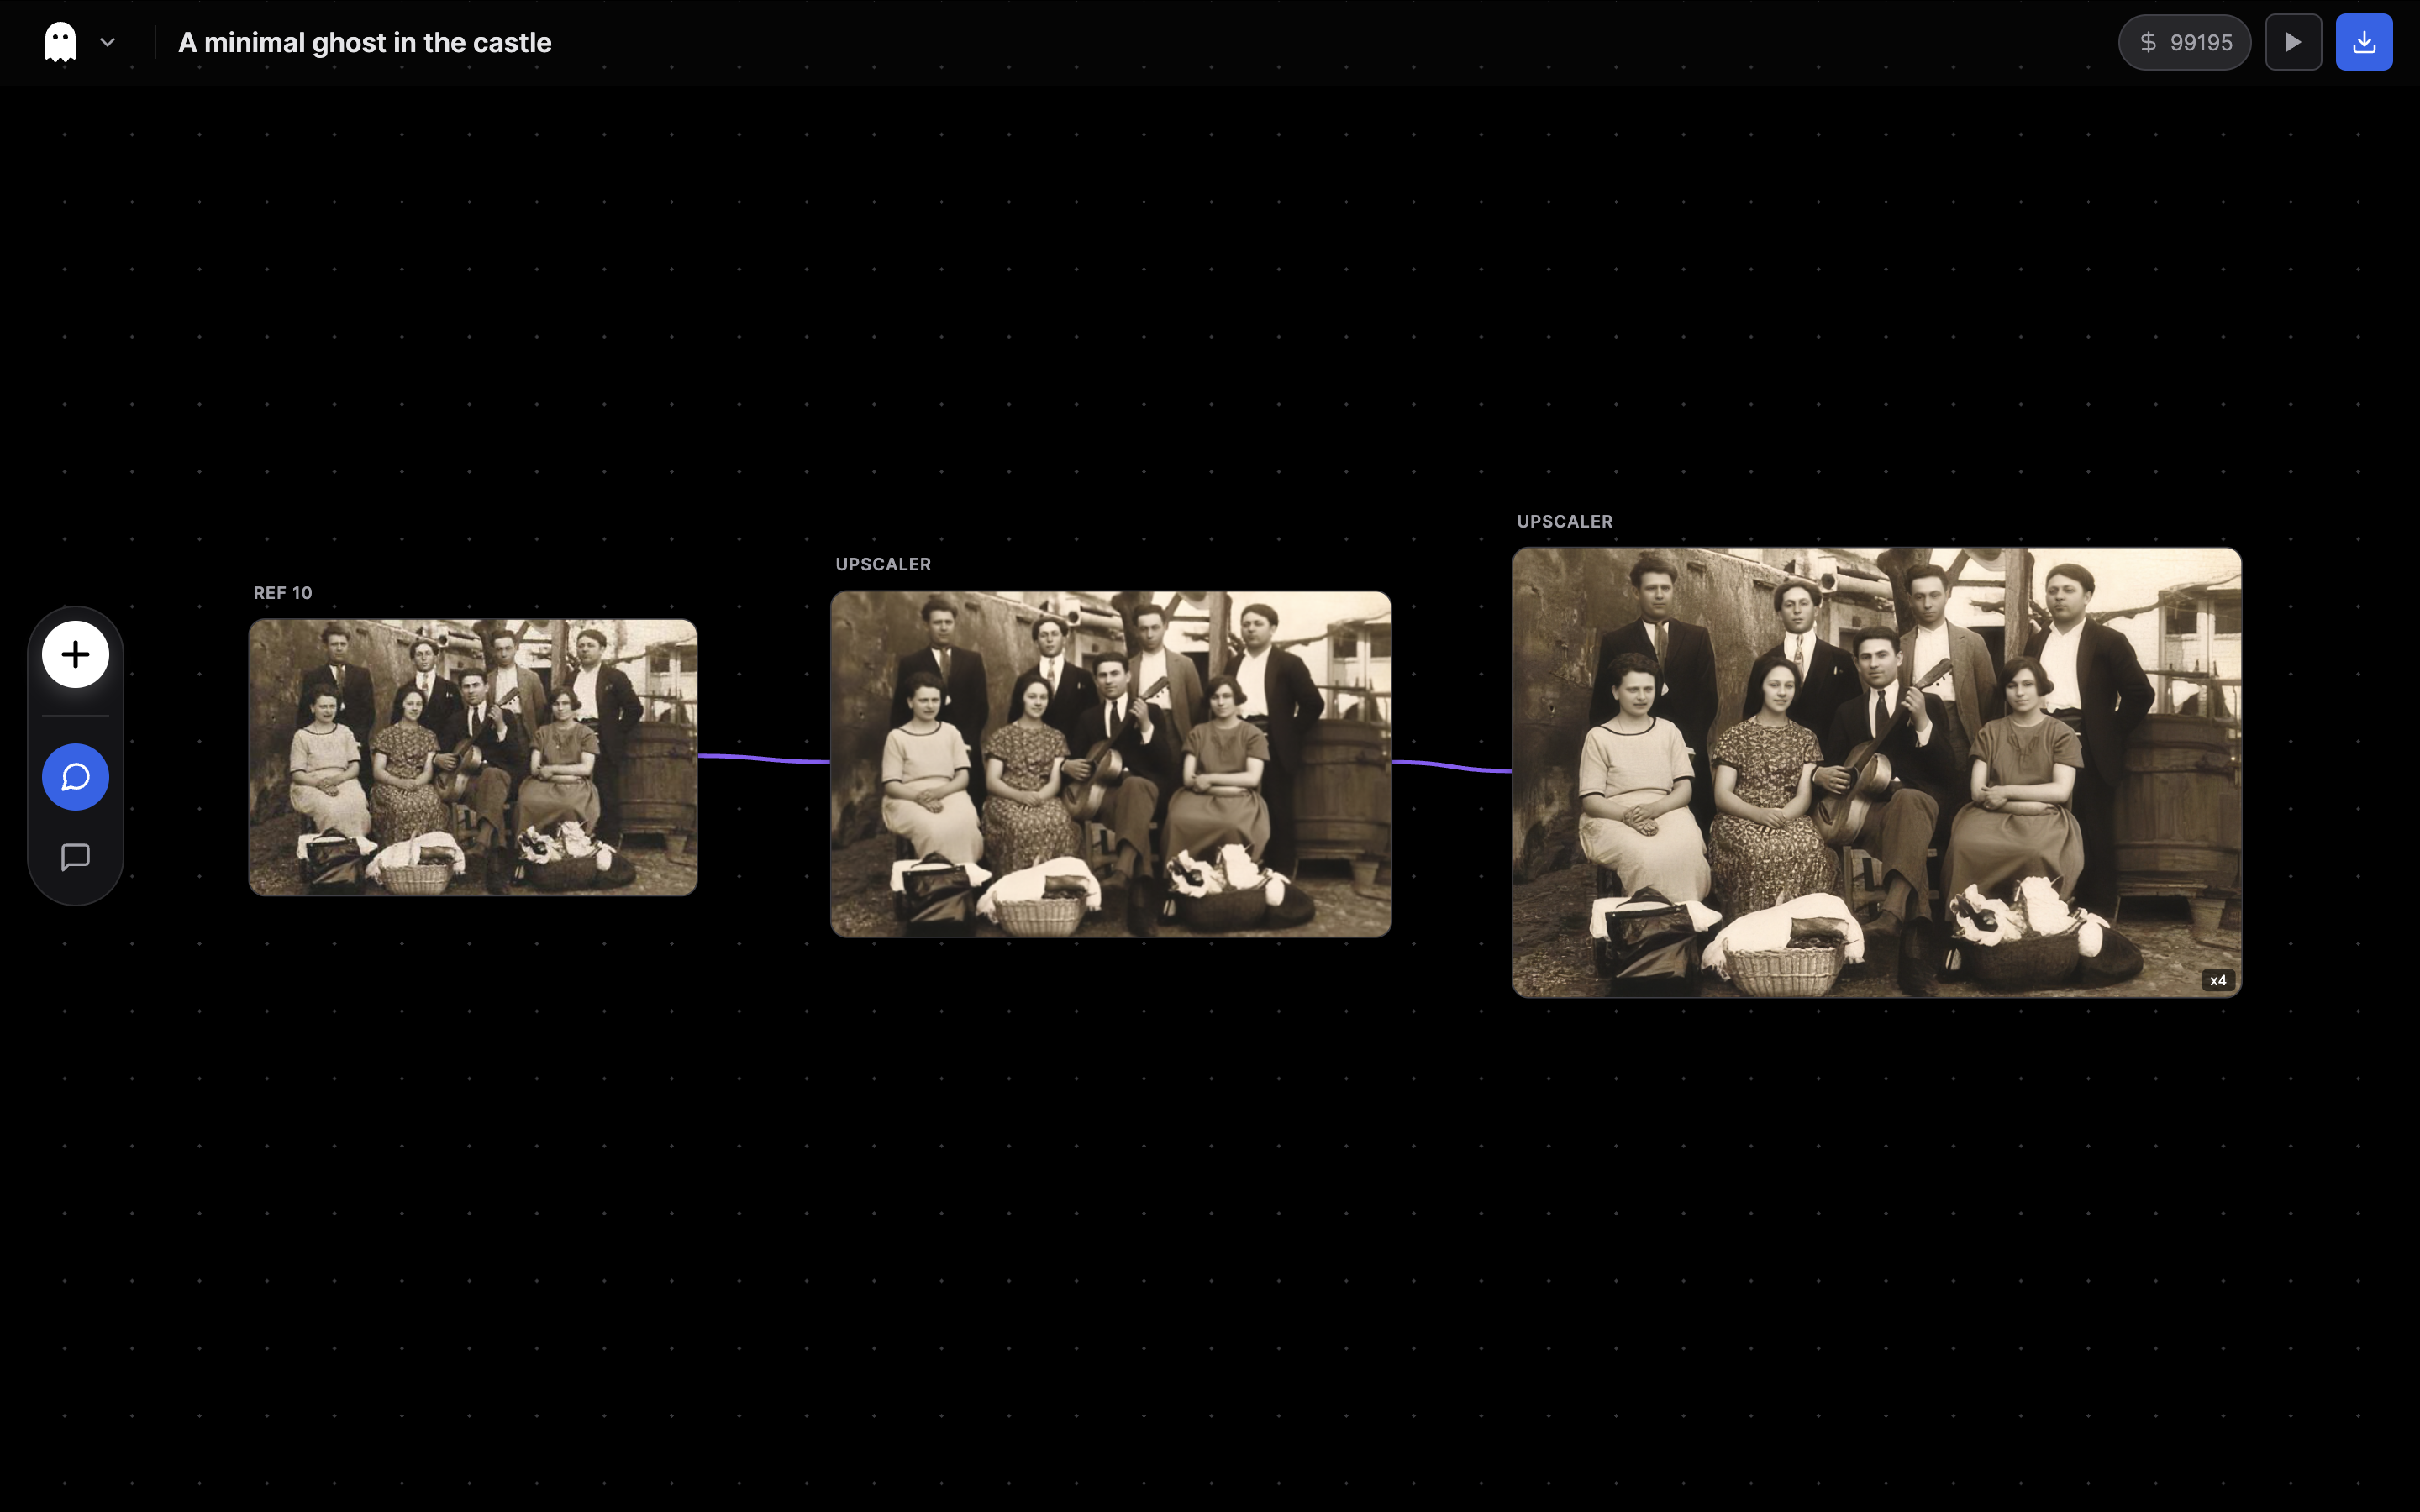
Use Case: Restoring Old Family Photos
One of the most powerful applications of the Upscaler Node is restoring vintage photography. Old photos often suffer from low resolution, blurriness, and physical damage like scratches.
The Workflow
For the best results with severely damaged photos, we recommend a two-step process:
- Step 1 (Restore): Connect your original image to an Upscaler Node set to Enhance mode with the Recovery or Recovery V2 model. This fixes physical damage and heavy artifacts.
- Step 2 (Enhance): Connect the output of the first node to a second Upscaler Node. Set this one to Standard V2 or High Fidelity V2 (2x or 4x scale), and enable Face Enhancement to bring back crisp details.
Example
Here is a real-world example of restoring a vintage group photo.
The Editor Setup: Notice how the original uploaded image (left) is connected to a chain of Upscaler nodes to progressively improve quality.
Before & After:
Original
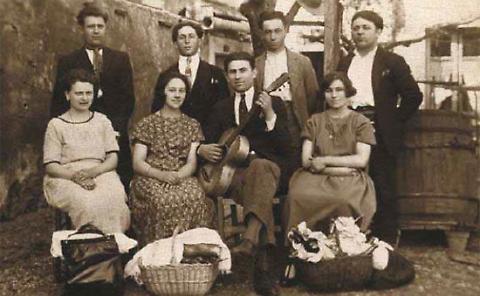
Restored Result
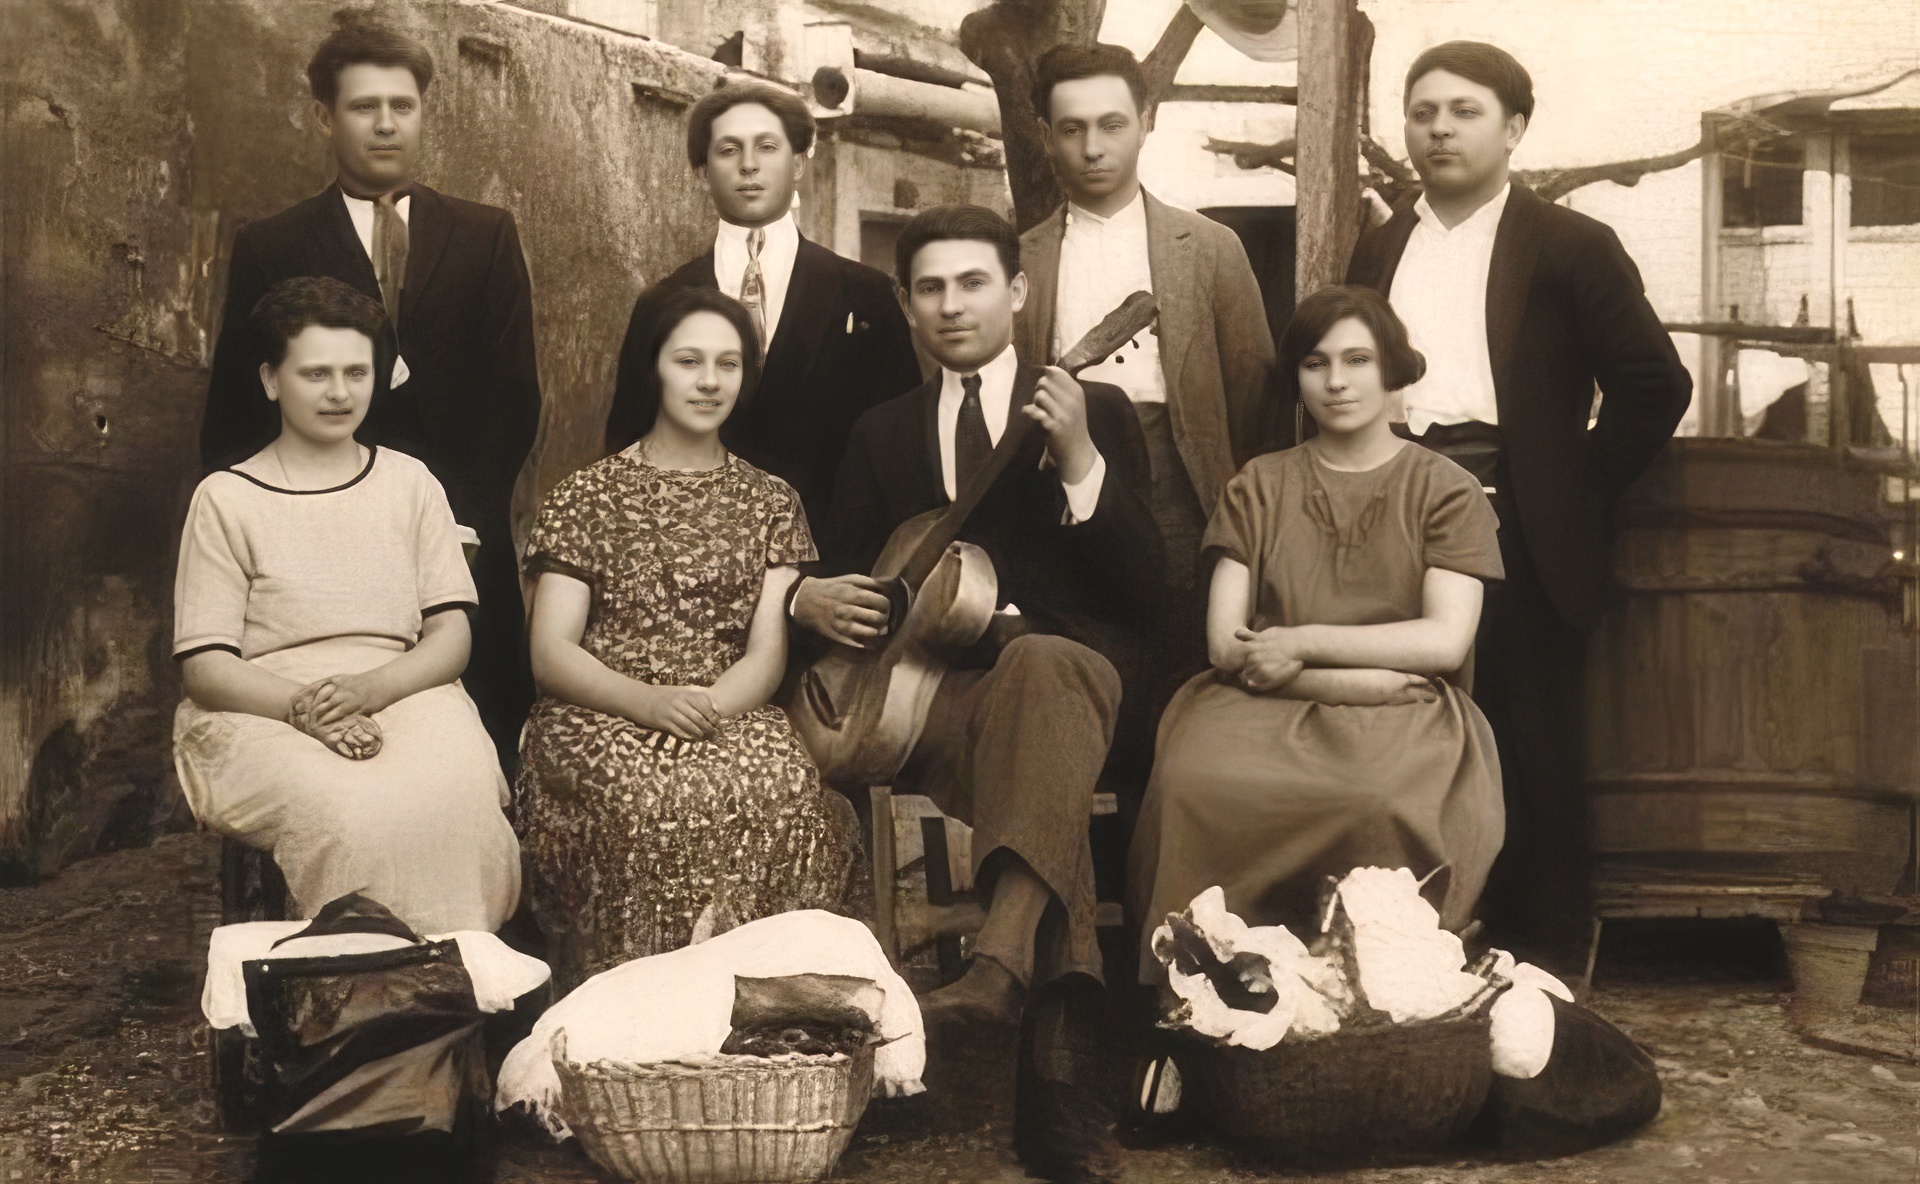
The result is a crisp, high-resolution image with recovered facial details, ready for printing or use in your video projects.
Use Case: Creating Transparent Assets
Use the Background Removal mode to create sprites or assets for compositing:
- Connect your source image to an Upscaler Node
- Set mode to Background Removal
- Choose BiRefNet (Portrait variant for people, General for objects) or Rembg (free, quick)
- Process to get a transparent PNG
For video, use Bria Video BG to remove backgrounds from entire clips — perfect for green-screen-style compositing without needing an actual green screen.
Pricing
| Model | Plan Required |
|---|---|
| Rembg | Free |
| All Topaz models | Pro |
| Clarity / AuraSR / Creative | Pro |
| BiRefNet / Bria RMBG | Pro |
| Video Upscale / Video BG | Pro |
See Also
- Reference Images — Source images for upscaling
- Scenes — Source videos for upscaling
- Draw Nodes — Create images to enhance
- Network Image Nodes — Import external images for upscaling
- Models & Specifications — Complete model details